How to implement Fluter Bloc in your application


State Management is a crucial part of Flutter Application Development, as without a managed state out data will be scattered everywhere which is very unmanagable specially in a large scale application.😧
BLOC stands for the Business Logic Components.It focuses on the separation of the business login from the presentation and allows us to reuse components both within our application and across other applications.It is also a state management solution used and recommended by Google Developers.
Bloc (Business Logic Component) offers a systematic approach to segregate business logic from the user interface, enhancing the predictability and testability of the application. Bloc oversees its context, providing a centralized mechanism for managing state and responding to events within the application architecture.🛸
flutter_bloc
The flutter_bloc package is a Dart package specifically designed to work with Flutter and build upon the BLoC (Business Logic Component) pattern. This package provides a set of classes and utilities to implement the BLoC pattern in a Flutter application.
Let’s Get Started 🙂
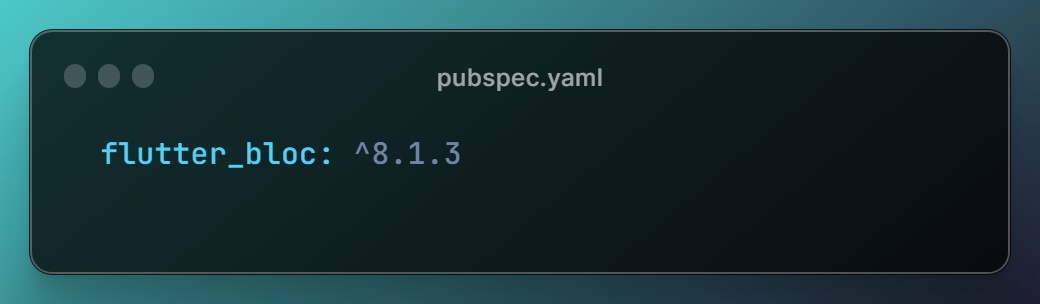
To start first create a new flutter project and then add run this command — flutter pub add flutter_bloc;
This command will add the package directly from the pub to your project.
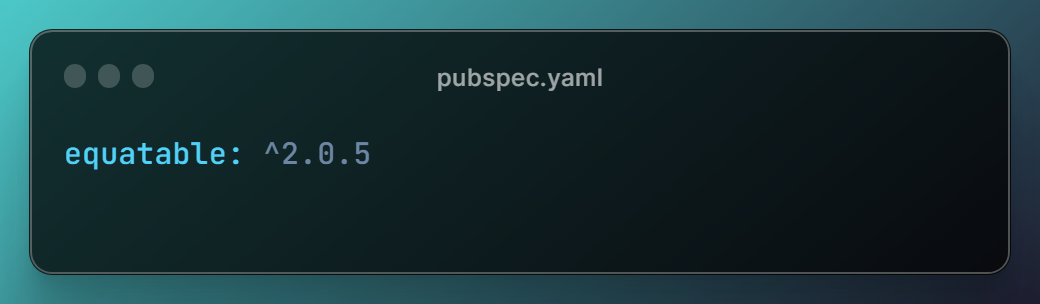
Adding Equatable to our packages -
Why Use Equatable — In the context of Flutter BLoCs (Business Logic Components), states often need to be compared to determine if a rebuild is necessary.Means if will compare the variables with there previos value and the value after the state changes and the the value properties and value itself has been modified then only it will rebuild the state of those variables.This way the bloc saves us from unneceassry builds and thus also improves the permormance in a way by calling less builds.
flutter pub add flutter_bloc;
after this run the command flutter pub get in the teriminal.
Why use the pub get command after we have added the packages 😕 ?
I got this question from many of my friends whome i taught flutter and here is the explaination why -
Running pub get or flutter pub get after adding a package to your Dart or Flutter project is necessary to fetch and download the dependencies specified in your project's pubspec.yaml file. Here are the key reasons why this step is important:
Dependency Resolution:
When you add a new package to your project by updating the
pubspec.yamlfile, you're specifying a dependency on that package.👉Running
pub getresolves these dependencies and fetches the necessary packages from the Dart package repository (Pub).👉
Download Dependencies:
The
pub getcommand downloads the package and its dependencies into your project'spubspec.lockfile and thepubspec.yamlfile.👉This ensures that you have the correct versions of the packages your project depends on.👉
Script Execution:
If you have post-fetch or pre-build scripts defined in your pubspec.yaml, running pub get ensures that these scripts are executed .Although our editors are smart enough but to ensure the packages fetched correctly and version is updated correctly if changed we need to use this command after each chnages or addtion made to pubspec file to ensure no conflict occurs.
Now Let’s Jump into the code 🦘—
I will use the counter demo that Flutter gives us by default after we create a new flutter project.This is a global demo with all the basic necessary functions to ensure what we need to learn in today’s article.We will add one more action to the which is to decrement the counter .So we are gonna use total two triggers on is to increment the counter and one is for the decrement of the counter.
Step 1 -
Create a folder named Counter Bloc and then we need to add 3 files in it -You can choose any name of your choise but he naming should be such as it should be coonected with the screen and functionality we are working with.🤓
counter_bloc.dart
counter_state.dart
counter_event.dart
Now Let’s jump into each file one by one
- counter_bloc.dart — let’s break it →
1.The CounterBloc class extends the Bloc class, specifying that it handles CounterEvent instances and manages CounterState as its state.
2. The constructor initializes the CounterBloc with an initial state of CounterState() using the super keyword.
3. The on method sets up an event handler. It listens for CounterEvent instances and delegates the event handling to the _mapEventToState method.
4. The _mapEventToState method is a private method responsible for mapping incoming events to state changes. It takes an event and an Emitter<CounterState>.This part checks the type of the incoming event and calls specific methods based on the event type.

5. The _mapIncrementEventToState method handles the increment event. It uses the emit method to update the state by creating a new state with an incremented counter.
6. The _mapDecrementEventToState method handles the decrement event similarly, updating the state with a decremented counter.
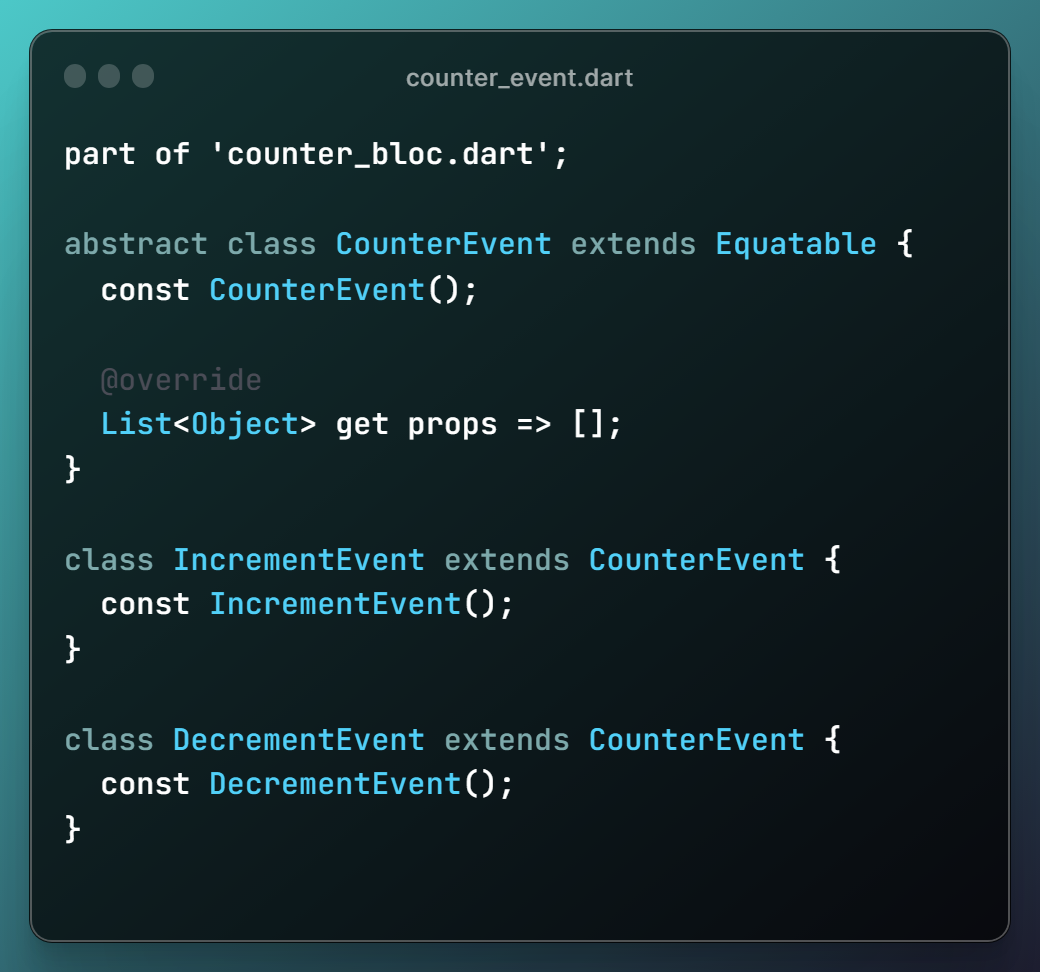
2. counter_event.dart — Let’s break it →
The Counter Event class will have all the events we want to define and use with out bloc.We use the abstarct class which extends Equatable. An abstract class cannot be instantiated directly and serves as a base class for other classes (in this case, events).
The
Equatablemixin is used to simplify the implementation of equality checks.Then we describe two events with one for the increment of the counter and one for the decrement of the counter.
3. counter_state.dart
We will create a class CounterState which extends the Equatable class.The Equatable mixin is used to simplify the implementation of equality checks as i stated above it will update the variable counter only if the previous value of the counter and the value after the bloc event is not with the same value and properties.
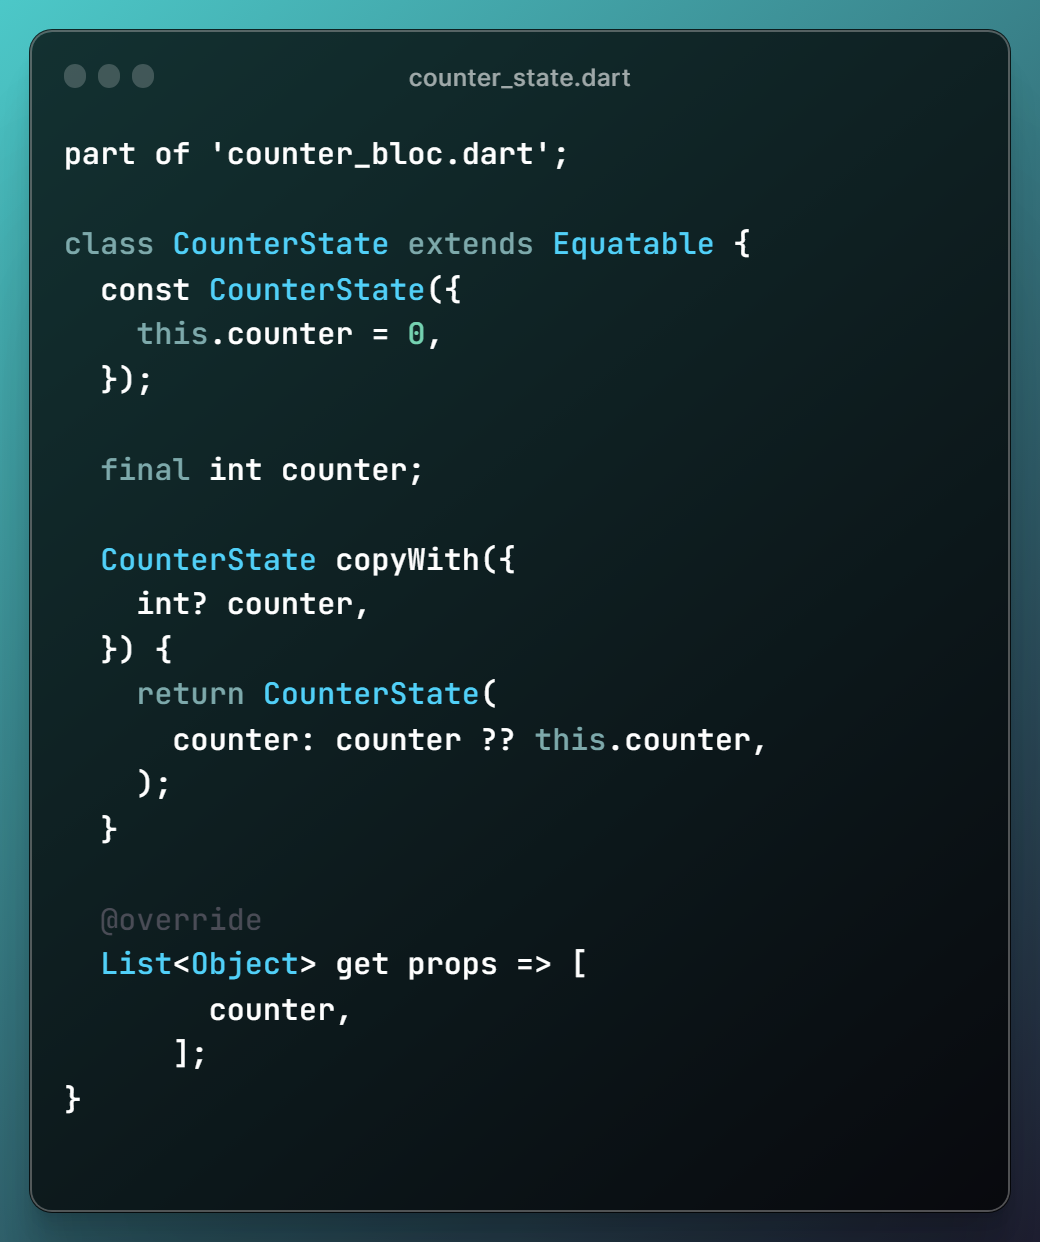
The constructor for the CounterState class initializes an instance of the class. It has a named parameter counter with a default value of 0. This means that if no value is provided for counter when creating an instance, it defaults to 0.
The
copyWithmethod is a common pattern used in Flutter for immutable state classes. It creates a new instance of the class with updated values.It takes an optional named parameter
counter, and if a new value is provided, it creates a newCounterStatewith the updated counter value. If no new value is provided, it retains the existing value — again as stated above .☝️☝️
return CounterState( counter: counter ?? this.counter, );
This line returns a new instance of CounterState with the updated counter value. If counter is null, it defaults to the current counter value, effectively creating a new instance with the same value.
@override List<Object> get props => [ counter, ];:
This line overrides the
propsgetter from theEquatablemixin. It returns a list of properties used for equality comparisons.In this case, it includes only the
counterproperty, indicating that instances ofCounterStateare considered equal if their counter values are the same.
In summery we create our events in event class and we add our variable that we want to update with changes in the state.
In bloc we access events and then update the state variables as per the logic implemented by us.
Now Let’s dive in the view 🏊♂️🏊♂️ —
We are gonna use 2 Bloc class here -
BlocProvider
Bloc Provider is a class responsible to provide bloc to all it’s children aka- all the childrens in the widget tree below with root as this class.
It will provide the bloc via the bloc via BlocProvider.of<T>(context).It is used as a Dependency injection (DI) widget so that a single instance of a bloc can be provided to multiple widgets within a subtree.
BlocBuilder
The BlocBuilder is responsible for updating and rebuilding the widget of the widget state changes hance it is responsible to update us if our counter varibale in incrementing or decrementing by rebulding the scaffold widget.
Replace your MyHomePage class with this class -
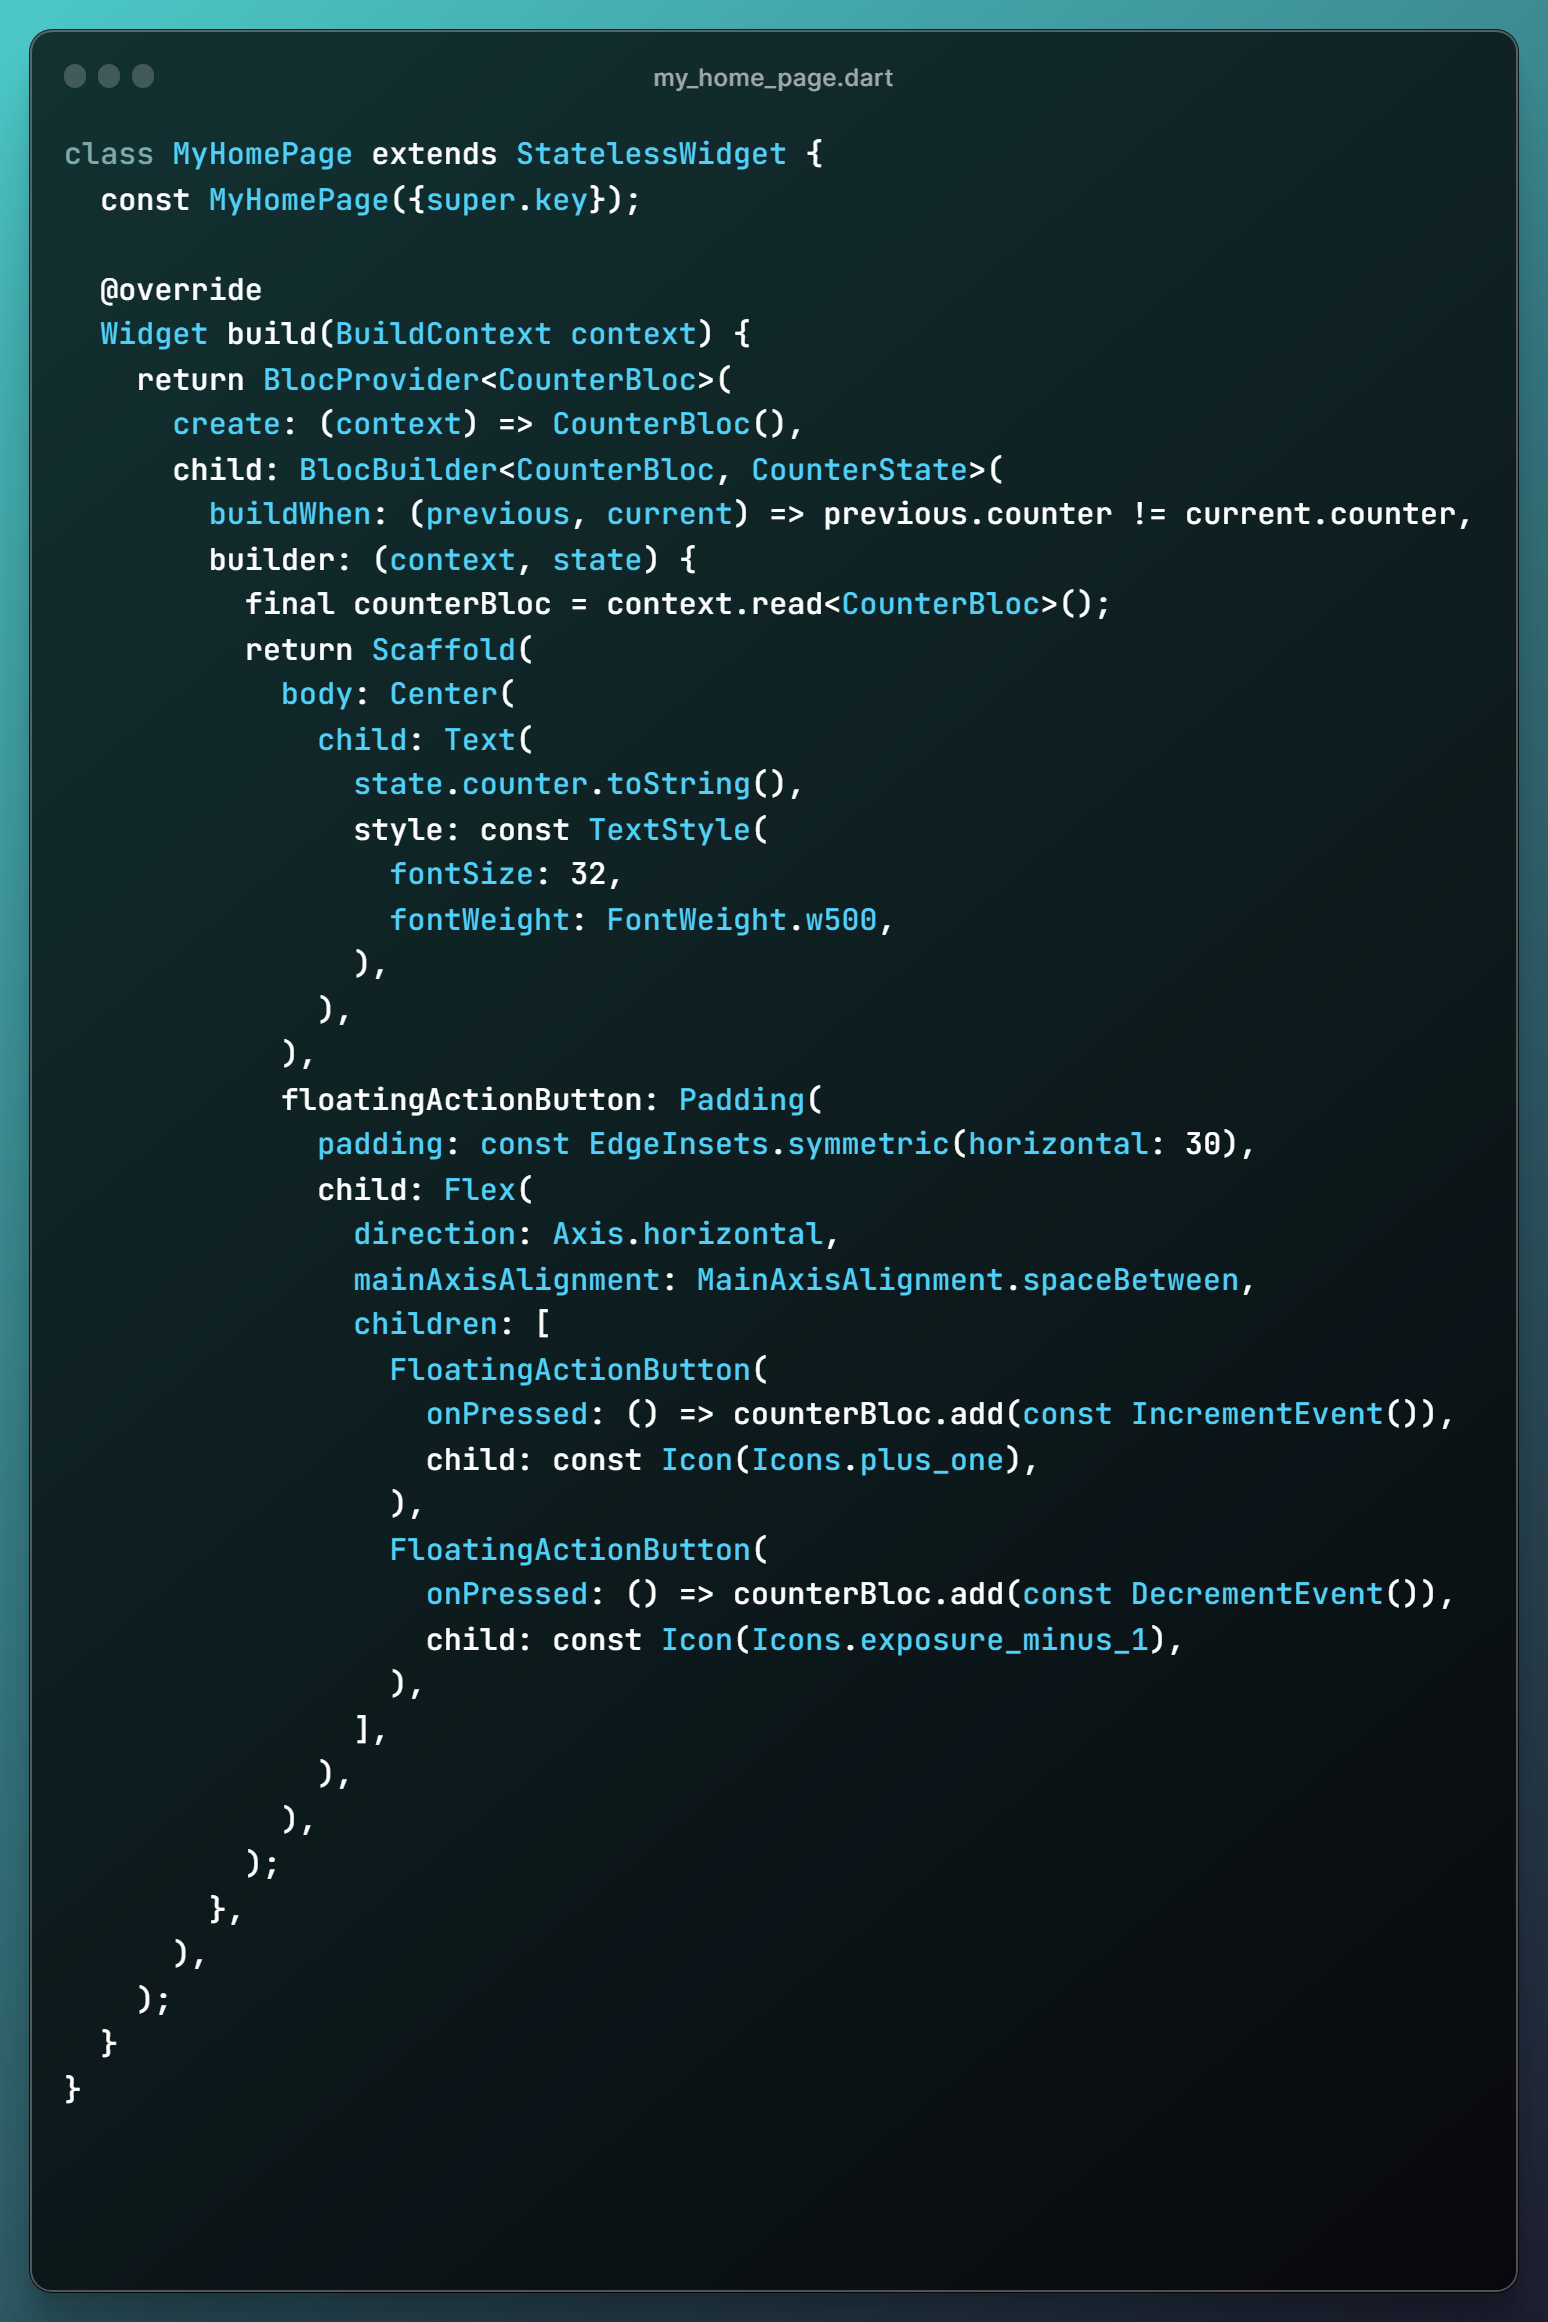
On click of floating action button we are calling the respective events of the bloc by adding them to the BlocProvider instance which is responsible for updating the value of the counter.
In the Text Widget we are using the counter variable from the state whoch is initialized with a value 0 as in counter_state.dart.
as we click on event the events is called the value of the counter variable is updated and the blocbuilder with rebuild the state by checking this line
buildWhen: (previous, current) => previous.counter != current.counter,
and this will rebuild the scaffold widget with the new counter value.This is the most basic example of the Bloc Architecture.
Conclusion:
I hope this article was helpful in understanding Bloc pattern application development. If you found it useful, feel free to share it with your friends or colleagues!
Special credit for this blog goes to my senior, Maulik Sinroja, my Flutter GOD, who has played a huge role in shaping my skills and capabilities.
Did I get something wrong? Let me know in the comments — I’d love to improve! After all, continuous improvement is the essence of being a coder. 😁
Clap 👏 on the icon 👇 If this article helped you.
❤ ❤ Thanks for reading this article ❤❤